Guide: Create A Tabbed Login and Register Page With Blazorise
This post will demonstrate how to use Blazorise Components to embed a login and registration form into an HTML tab. I will also show how to ensure data quality by validating form submissions. We will focus on just the structure and markup of the user interface, which is intended to demonstrate the use of Blazorise components and does not cover advanced topics such as tokens, cryptography, and hashing.
What is a login page?
The login page is an entry point to a web application and grants authorized users access to application resources and functionality.
According to the Open Web Application Security Project Foundation Top 10, the confirmation of the user's identity, authentication, and session management is critical to protect against authentication-related attacks, which is currently no. 7 on the OWASP Top 10.
Security starts with design, whether architecturally or via the UI and the structure and layout must be designed and properly implemented to ensure user information is exchanged quickly and securely.
Creating the login page
The page is structured by using Blazorise Tabs to have both the login and registration form on the same page. That way, new and existing users can be onboarded to the platform without needing to navigate to a different page.
Blazorise components use semantic HTML elements and this gives meaning to both the browser and the developer. For SEO-intensive applications, semantic HTML is a better option than non-semantic elements such as div and span.
1. Prerequisites
To begin, scaffold a new Blazor WebAssembly project if you already don't have any. Follow our How to create a Blazorise WASM application: A Beginner's Guide to learn how to setup Blazor WASM with Blazorise components.
2. Create A Sidebar Menu Item.
To make sure your login page is accessible, you need to add a <nav link> to your sidebar menu.
You can create a new one from scratch by copy/pasting the snippet below into the NavMenu.razor file or edit any of the preexisting div-class elements. The second option might affect other pages in the project.
<div class="nav-item px-4">
    <NavLink class="nav-link" href="login">
        <span class="oi oi-list-rich" aria-hidden="true"></span>Login
    </NavLink>
</div>
3. Create a razor page.
In the Pages folder of your Blazor project, create a new razor file and name it Login.razor
Copy and paste the code snippet below to create the markup.
<Tabs SelectedTab="" SelectedTabChanged=""> <Items> <Tab Name="login">Login</Tab> <Tab Name="register">Register</Tab> </Items> <Content> <TabPanel Name="login"> Place form here </TabPanel> <TabPanel Name="register"> Place Form Here. </TabPanel> </Content> </Tabs>
The Tabs element allow users to navigate to different sections of a single-page application. We embedded the login and register forms into tabs to allow users to switch easily without creating a single page for each.
The Tab Items represent the various tab menus. It is used to contain the name of the tab.
In the Content element, you can embed other elements or components to complete the markup of the tab. In our case, we will use the TabPanel component to build out our login form and place the content of the actual login.
Now define the selectedTab variable in the @@code block section of the razor page.
@code{
    string selectedTab = "login";

    private Task OnSelectedTabChanged( string name )
    {
        selectedTab = name;

        return Task.CompletedTask;
    }
}
Click here to read more about Blazorise Tabs Component
4. Adding Fields
After creating the tabs component, we have to fill it with content. Since we are building a login form, the Field component will be embedded into the Tab Content element.
<Field> <FieldLabel>Email</FieldLabel> <TextEdit @bind-Text="" Placeholder="Enter email..." /> </Field> <Field> <FieldLabel>Password</FieldLabel> <TextEdit @bind-Text="" Placeholder="Enter Password.." /> </Field> <Field> <Check TValue="bool" @bind-Checked="">Remember Me</Check> </Field>
Notice how we used the Fields component used to layout input elements. The purpose of the Field component is to give a form elements proper structure that includes standardized spacing like padding and margin. Without it, we would have to handle spacing manually.
You can repeat the same code for the register tab and add or remove fields based on your project needs.
After creating form fields, add a Button component to submit user input.
<Button Color="Color.Primary">Login</Button>
5. Implementing Validation
Now that we have structured both the login and register tabs, we have to ensure that users enter the correct data. The Validation component allows you to verify user inputs by finding and correcting errors such as email or password length. It guides the user to inform the correct form of data.
You can either validate through method handlers or data annotations.
The code snippet below illustrates how you can validate the email field using the method handlers.
<Validations @ref="" Mode="ValidationMode.Manual" ValidateOnLoad="false"> <Validation Validator="ValidationRule.IsEmail"> <Field> <FieldLabel>Email</FieldLabel> <TextEdit @bind-Text="" Placeholder="Enter email..."> <Feedback> <ValidationNone>Please Enter Your Email. </ValidationNone> <ValidationSuccess>Email is good</ValidationSuccess> <ValidationError>Please Enter A Valid Email</ValidationError> </Feedback> </TextEdit> </Field> </Validation> <Validation Validator="ValidationRule.IsNotEmpty"> <Field> <FieldLabel>Password</FieldLabel> <TextEdit @bind-Text="" Placeholder="Enter Password.." /> </Field> </Validation> <Field> <Check TValue="bool" @bind-Checked="">Remember Me</Check> </Field> </Validations>
Add variable definitions in the @@code section of the razor page
@code{
    string name;
    string email;
    string password;
    bool rememberMe;
}
Final Example
By the end, your razor page should look something like this.
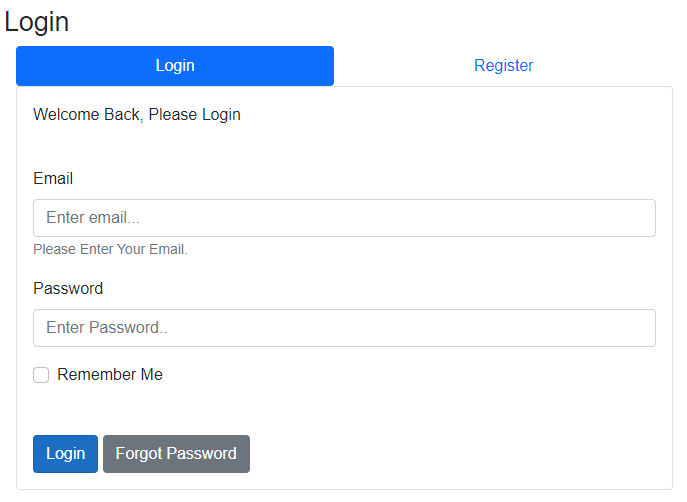
And the full code that includes a register page.
<Tabs SelectedTab="" SelectedTabChanged="" Pills FullWidth> <Items> <Tab Name="login">Login</Tab> <Tab Name="register">Register</Tab> </Items> <Content> <TabPanel Name="login"> <Card> <CardBody> <CardTitle> Welcome Back, Please Login </CardTitle> </CardBody> <CardBody> <Validations @ref="" Mode="ValidationMode.Manual" ValidateOnLoad="false"> <Validation Validator="ValidationRule.IsEmail"> <Field> <FieldLabel>Email</FieldLabel> <TextEdit @bind-Text="" Placeholder="Enter email..."> <Feedback> <ValidationNone>Please Enter Your Email. </ValidationNone> <ValidationSuccess>Email is good</ValidationSuccess> <ValidationError>Please Enter A Valid Email</ValidationError> </Feedback> </TextEdit> </Field> </Validation> <Validation Validator="ValidationRule.IsNotEmpty"> <Field> <FieldLabel>Password</FieldLabel> <TextEdit @bind-Text="" Placeholder="Enter Password.." /> </Field> </Validation> <Field> <Check TValue="bool" @bind-Checked="">Remember Me</Check> </Field> </Validations> </CardBody> <CardBody> <Button Color="Color.Primary" Clicked="">Login</Button> <Button Color="Color.Secondary">Forgot Password</Button> </CardBody> </Card> </TabPanel> <TabPanel Name="register"> <Card> <CardBody> <CardTitle> New Here? Create An Account </CardTitle> </CardBody> <CardBody> <Validations @ref="" Mode="ValidationMode.Manual" ValidateOnLoad="false"> <Validation Validator="ValidationRule.IsNotEmpty"> <Field> <FieldLabel>Name</FieldLabel> <TextEdit @bind-Text="" Placeholder="Enter Your Name" /> </Field> </Validation> <Validation Validator="ValidationRule.IsEmail"> <Field> <FieldLabel>Email</FieldLabel> <TextEdit @bind-Text="" Placeholder="Enter Your Email"> <Feedback> <ValidationNone>Please Enter your email.</ValidationNone> <ValidationSuccess>Email is valid</ValidationSuccess> <ValidationError>Enter Valid email </ValidationError> </Feedback> </TextEdit> </Field> </Validation> <Validation Validator="ValidationRule.IsNotEmpty"> <Field> <FieldLabel>Password</FieldLabel> <TextEdit @bind-Text="" Placeholder="Enter Password" /> <FieldHelp>Password Strength: <Text TextColor="TextColor.Danger">Strong</Text></FieldHelp> </Field> </Validation> </Validations> </CardBody> <CardBody> <Button Color="Color.Primary" Clicked=""> Create Account </Button> </CardBody> </Card> </TabPanel> </Content> </Tabs>
@code {
    Validations loginValidationsRef;
    Validations registerValidationsRef;

    string selectedTab = "login";

    string name;
    string email;
    string password;
    bool rememberMe;

    async Task OnLoginClicked()
    {
        if ( await loginValidationsRef.ValidateAll() )
        {
            // do the real login here

            await loginValidationsRef.ClearAll();
        }
    }

    async Task OnRegisterClicked()
    {
        if ( await registerValidationsRef.ValidateAll() )
        {
            // do the real login here

            await registerValidationsRef.ClearAll();
        }
    }
}
Resource
You can get the source code of the sample from the LoginPageDemo in Blazor demo on GitHub.
Conclusion
Registration and login are essential components of web security. Form validation also helps users to submit the correct data and increases data quality in the process.
This post demonstrated how to embed login and registration forms into a tab element. We also showed how you could guide users to enter the correct data into your forms using validations.
From the post, we established how easy it is to build modern web functionality with Blazorise components in a few lines of code. We invite you to try Blazorise components for free or apply for a license on commercial products and get assistance from a dedicated Blazorise Mentor.
Related blogs
- How to create a Blazorise WASM application: A Beginner's Guide
- Blazorise Form Validation With Data Annotations: A Beginner's Guide